Shopify Custom App Setup Guide
Purpose: Step-by-step instructions for creating and configuring a Shopify Custom App for the Eli Health mobile app integration.
Date: November 12, 2025 Prerequisites: Shopify Admin access to Eli Health store
Overview
This guide covers:
- Creating a single Custom App in Shopify
- Configuring multiple redirect URIs (dev, staging, production)
- Setting up API scopes and credentials
- Creating test accounts for development
- Environment-specific configuration
Important: You only need ONE Custom App that serves all environments (dev, staging, prod) using multiple redirect URIs.
Current Eli App URL Schemes
Based on your existing app configuration:
| Environment | iOS URL Scheme | Backend API |
|---|---|---|
| Dev | eli:// | https://dev.eli-app.com |
| Staging | eli:// | https://staging.eli-app.com |
| Production | eli:// | https://app.eli.health |
Note: The same custom URL scheme (eli://) is used for all environments. The app determines the environment based on build configuration.
Part 1: Create Custom App in Shopify
Step 1: Enable Custom App Development
- Log into Shopify Admin:
https://[your-store].myshopify.com/admin - Navigate to: Settings → Apps and sales channels
- Click "Develop apps" tab
- If prompted, click "Allow custom app development"
- Confirm the prompt about custom app permissions
Step 2: Create the Custom App
- Click "Create an app"
- Fill in app details:
- App name:
Eli Health Mobile - App developer: Select your admin email
- App name:
- Click "Create app"
Part 2: Configure API Scopes ✅ COMPLETED
Step 3: Admin API Configuration ✅
You've already completed this! Here's what you configured:
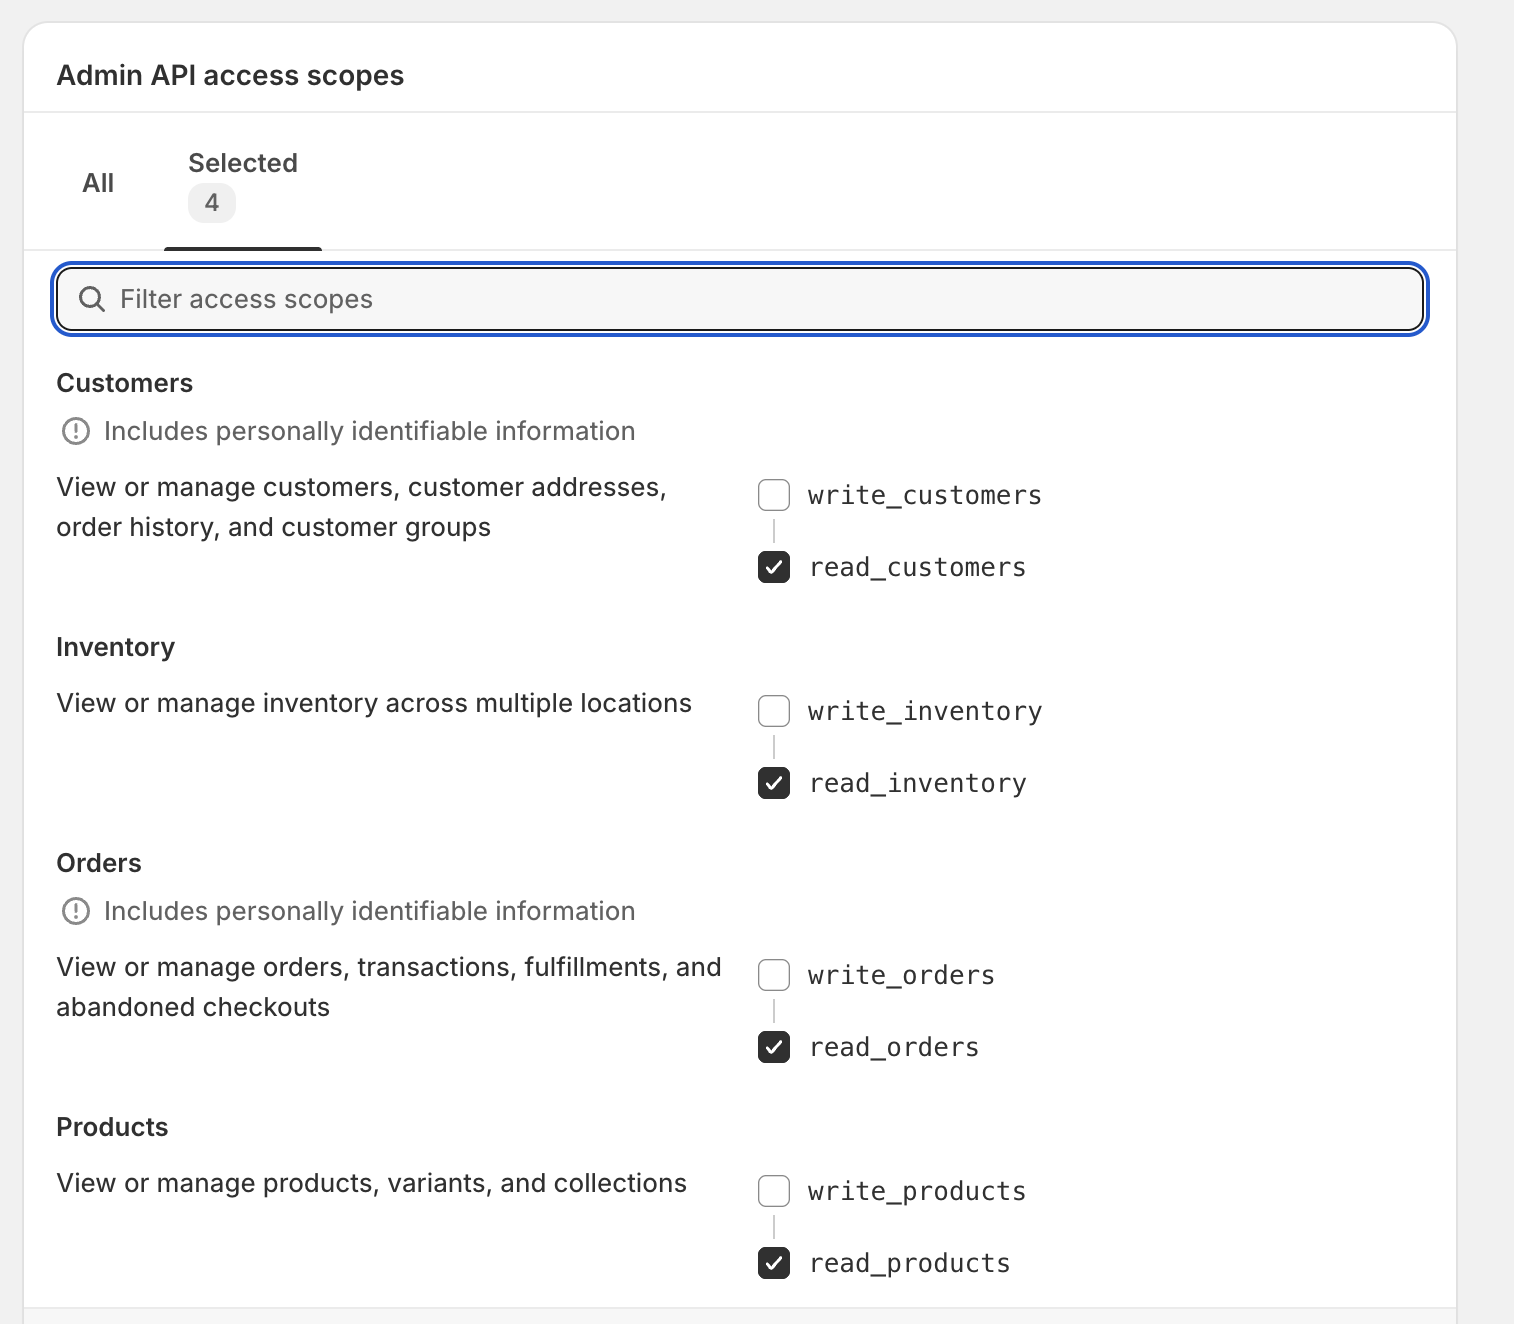
Selected Scopes:
- ✅
read_products- Read product catalog - ✅
read_customers- Read customer information - ✅
read_orders- Read order data - ✅
read_inventory- Read inventory levels
Perfect! These scopes give the backend everything it needs to:
- Sync product catalog
- Query customer information
- Retrieve order history
- Check product availability
No write permissions needed since all product management happens in Shopify Admin.
Step 4: Customer Account API Configuration ✅ COMPLETED
You've already completed this via the Headless sales channel!
What you did:
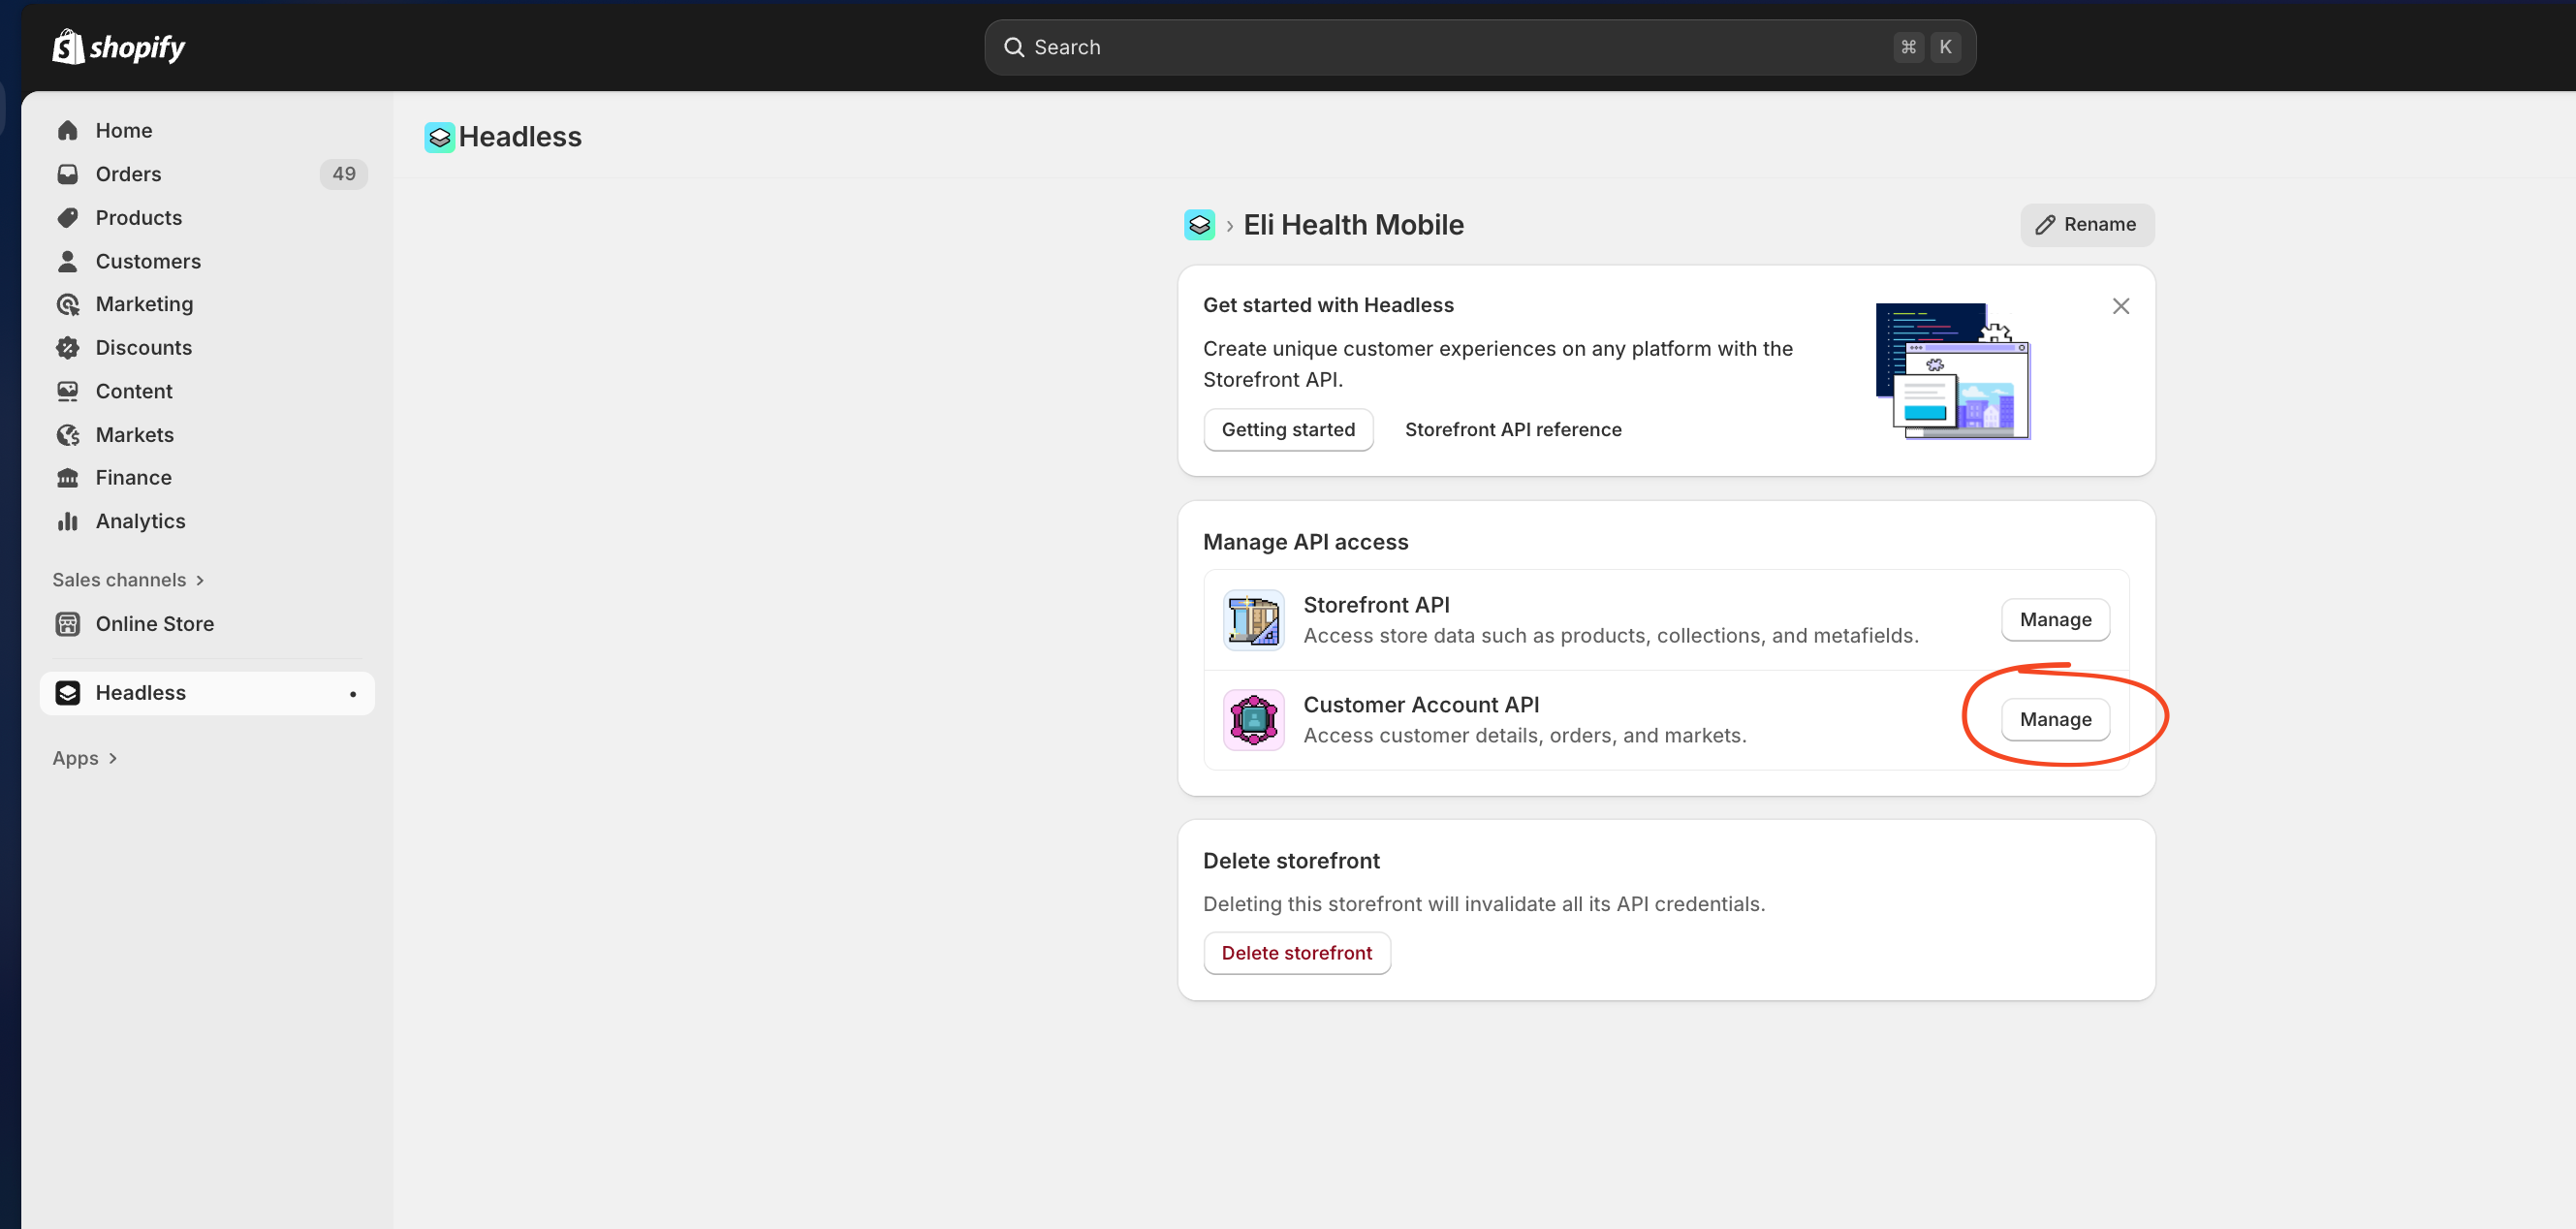
- Navigated to Sales Channels → Headless
- Clicked "Create storefront"
- Created storefront: "Eli Health Mobile"
- Clicked "Manage" on Customer Account API
- Configured as Public (web app) client type (correct for mobile PKCE)
- Added callback URL (see Step 5 below)
- CRITICAL: Added JavaScript Origins (see Step 5a below)
Credentials obtained:
- ✅ Client ID:
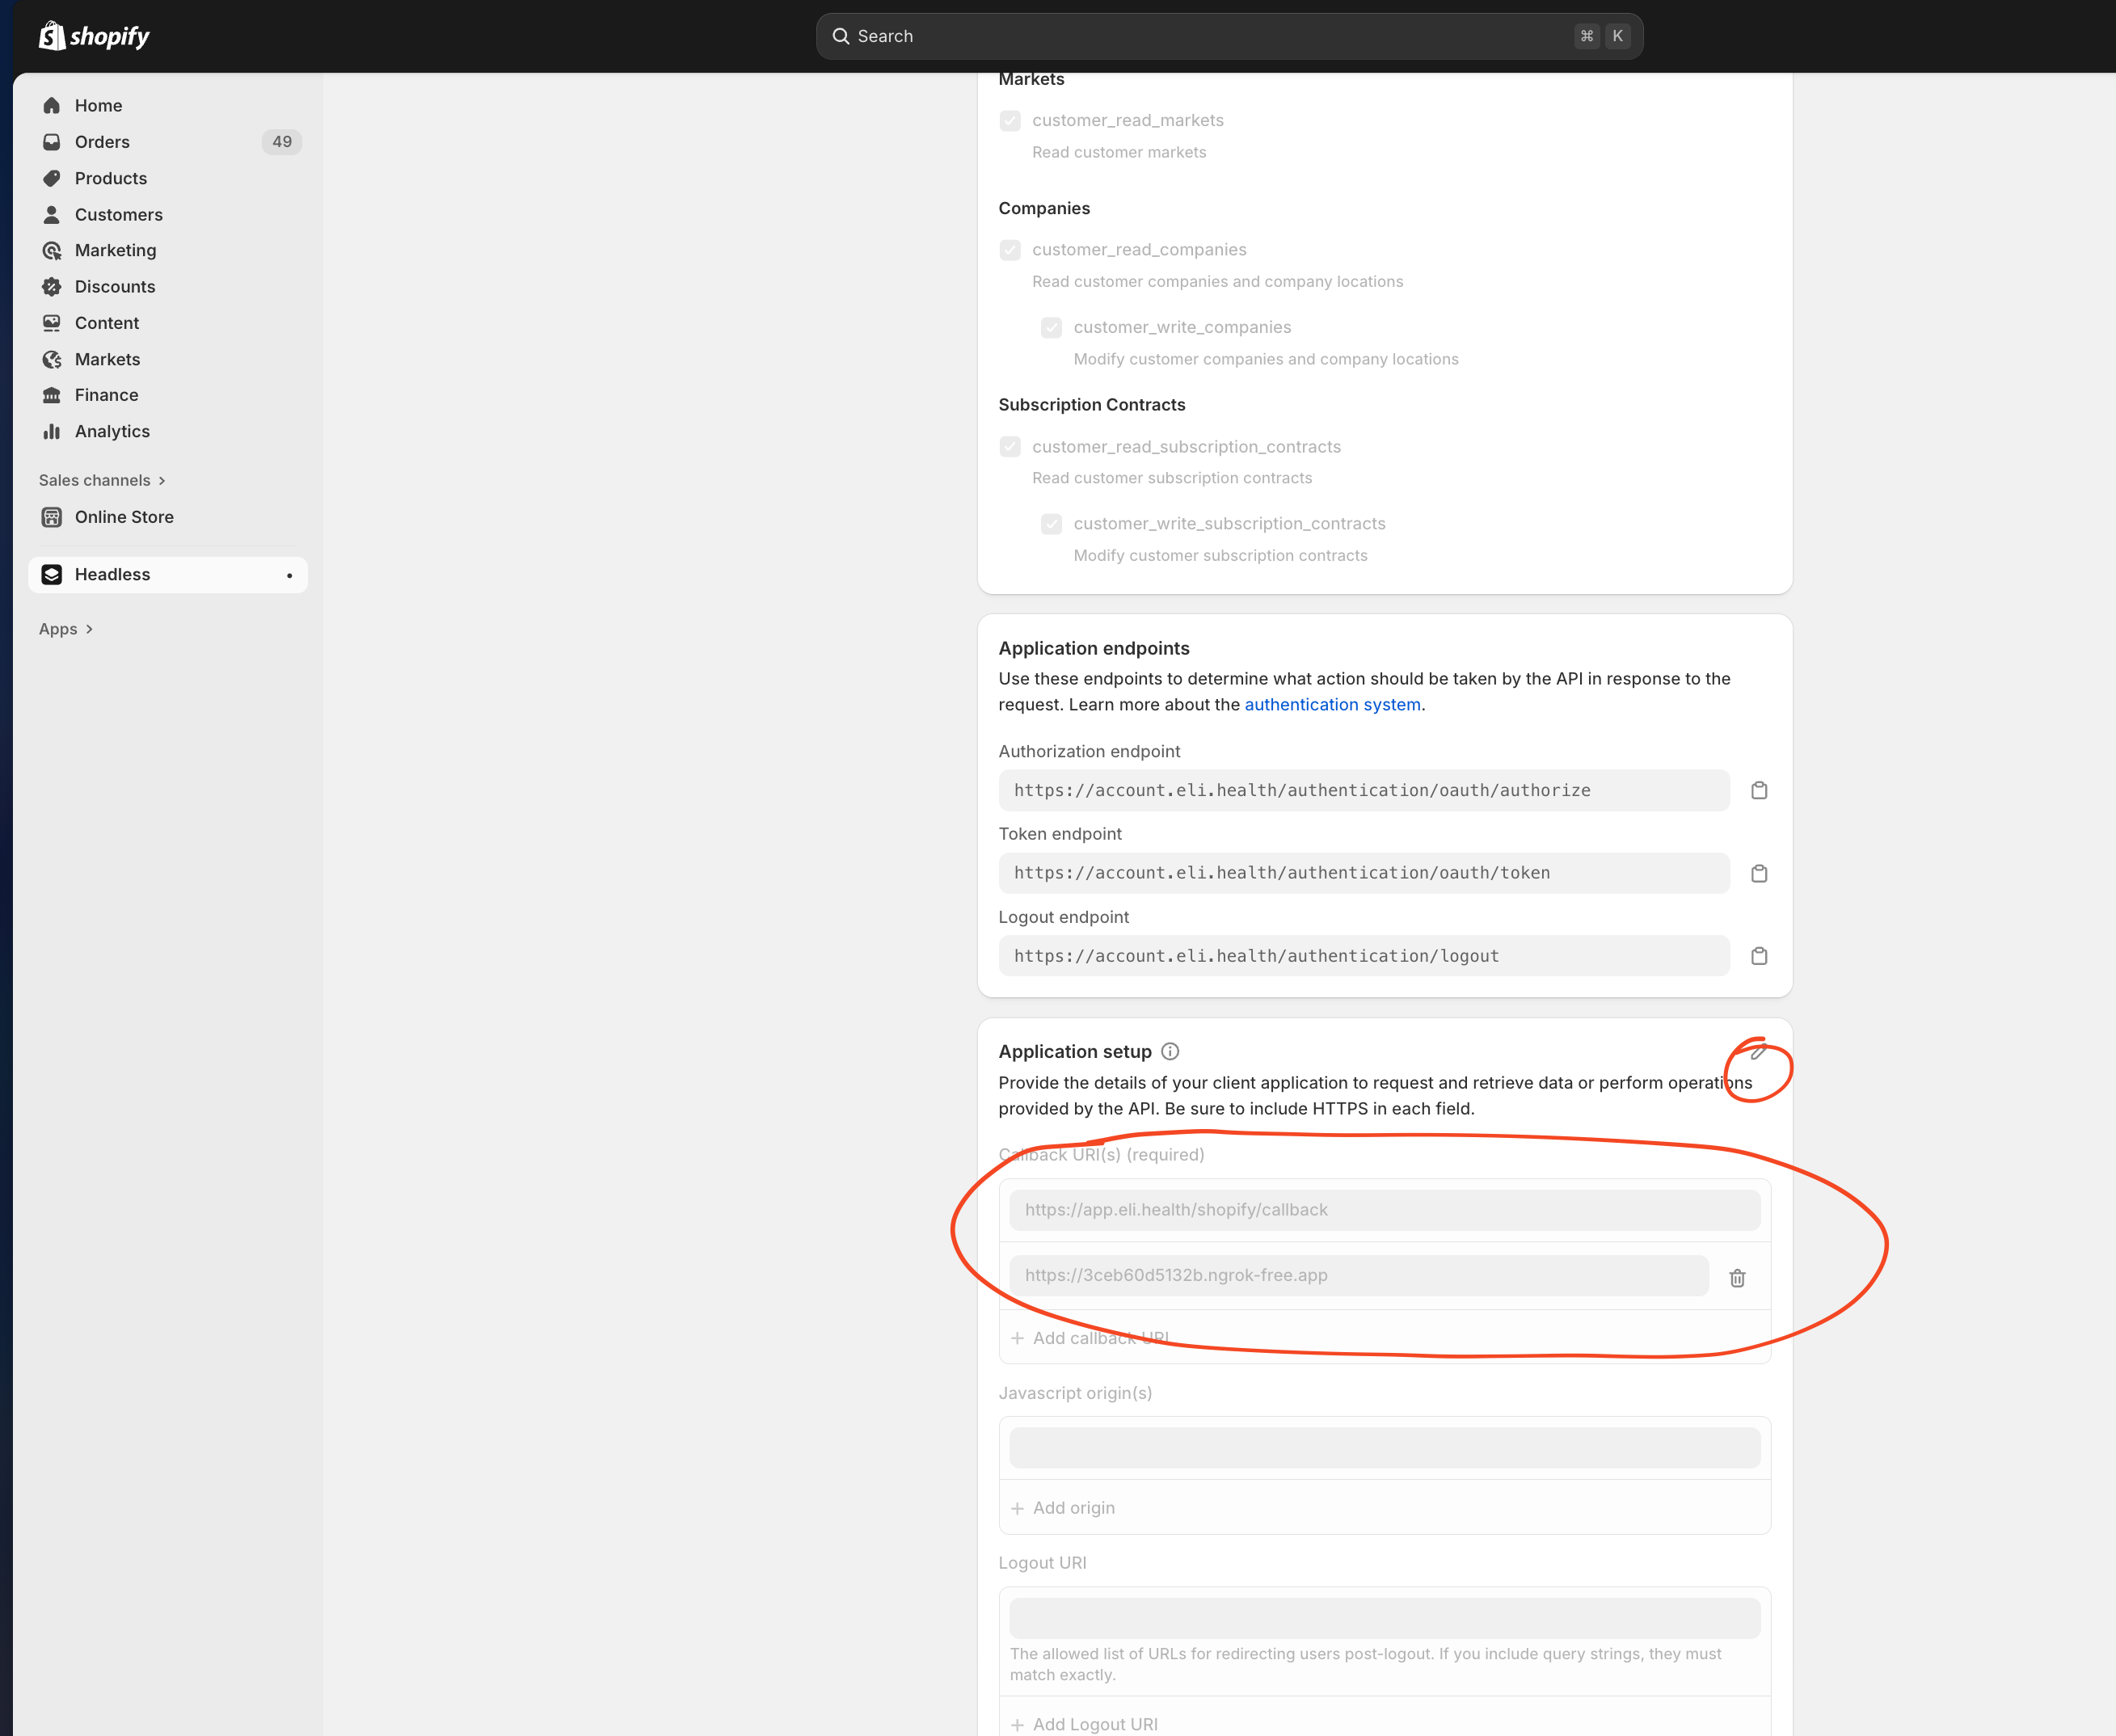
2d989895-5913-4700-b2be-48f1af8929da - ✅ Authorization endpoint:
https://account.eli.health/authentication/oauth/authorize - ✅ Token endpoint:
https://account.eli.health/authentication/oauth/token - ✅ No client secret (PKCE public client - correct for mobile)
IMPORTANT: Custom Vanity Domain
Eli Health uses a custom vanity domain (account.eli.health) instead of Shopify's default domain. The OAuth endpoints use:
- Domain:
account.eli.health(custom domain configured in Shopify) - Path:
/authentication/oauth/(not/oauth/or/account/oauth/)
How to discover the correct endpoints: You can verify the OAuth URLs by querying Shopify's OpenID discovery endpoint:
curl https://elihealth.myshopify.com/.well-known/openid-configuration | jq -r '.authorization_endpoint, .token_endpoint'
This will return the actual configured endpoints for your store.
Part 3: Configure Redirect URI ✅ COMPLETED
Step 5: Add Redirect URI ✅
You've already configured this!
Callback URL configured:
https://app.eli.health/shopify/callback
Why Universal Link instead of custom URL scheme:
- ✅ Shopify requires HTTPS callback URLs (rejects
eli://scheme) - ✅ More secure (prevents other apps from intercepting)
- ✅ Modern iOS best practice
- ✅ Already have Universal Links working for signup/reset-password
Important Format Requirements:
- ✅ Must be HTTPS
- ✅ Case-sensitive
- ✅ No trailing slash
- ✅ Must match exactly what's configured in Shopify
Saved in Shopify: ✅ Done
How to Add/Edit Callback URLs in Shopify
Step-by-Step with Screenshots:
-
Navigate to Sales Channels → Headless

-
Find your storefront and click "Manage" on Customer Account API
-
Add or edit callback URLs
- Click "Add redirect URI"
- Enter your HTTPS callback URL
- You can have multiple callback URLs (production, dev, local testing)
- Click "Save"
Multiple Callback URLs (Recommended):
You can configure multiple callback URLs for different environments:
https://app.eli.health/shopify/callback           # Production
https://dev.eli-app.com/shopify/callback          # Development
https://staging.eli-app.com/shopify/callback      # Staging
https://abc123.ngrok-free.app/shopify/callback    # Local testing (ngrok)
This allows you to test OAuth flow in all environments without reconfiguring Shopify each time.
How This Works
When users authenticate via Shopify OAuth:
- Shopify redirects to:
https://app.eli.health/shopify/callback?code=xxxxx&state=xxxxx - Backend receives request (shopify-callback.controller.ts)
- Backend redirects to custom scheme:
eli://shopify/callback?code=xxxxx&state=xxxxx - iOS app opens via deep link handler
- App processes OAuth callback and exchanges code for token
This leverages your existing Universal Links infrastructure (AASA file already updated).
Step 5a: Configure JavaScript Origins ⚠️ CRITICAL - REQUIRED
What are JavaScript Origins?
JavaScript Origins are the domains from which your backend API makes GraphQL requests to Shopify's Customer Account API. Shopify requires an Origin header in all GraphQL requests, and that origin must be in the allowed list.
⚠️ Without this configuration, you will get 401 "Invalid code" errors!
How to Configure:
- Navigate to Sales Channels → Headless in Shopify Admin
- Find your storefront: "Eli Health Mobile"
- Click "Manage" on Customer Account API
- Scroll to the "JavaScript Origins" section
- Click "Add JavaScript origin"
- Enter:
https://account.eli.health - Click "Save"
Multiple Origins for Different Environments:
You can add multiple origins for dev, staging, and production:
https://account.eli.health              # Production
https://dev.eli-app.com                 # Development
https://staging.eli-app.com             # Staging
https://abc123.ngrok-free.app           # Local testing (ngrok)
Why this is required:
The backend includes an Origin header in GraphQL requests:
headers: {
  'Authorization': `Bearer ${accessToken}`,
  'Content-Type': 'application/json',
  'Origin': 'https://account.eli.health',  // Must match JavaScript Origins
}
Shopify validates this origin against the configured list. If the origin is not in the list, Shopify returns a 401 error.
Reference: Shopify Customer Account API - Origin Header Requirement
Part 4: Install the App and Get Credentials
Step 6: Install the Custom App
- Go to "API credentials" tab
- Click "Install app" button
- Confirm installation
Step 7: Collect API Credentials ✅ COMPLETED
You've collected all necessary credentials!
1. Admin API Access Token ✅
Status: ✅ Obtained and stored
Store Domain: elihealth.myshopify.com
Admin API Token: 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
API Key: 2641be696c6c743a75a979445f1f2a1c
API Secret: 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
Usage: Backend queries (products, customers, orders, inventory)
Scopes: read_products, read_customers, read_orders, read_inventory
2. OAuth Client Credentials ✅
Status: ✅ Obtained via Headless storefront
Client ID: 2d989895-5913-4700-b2be-48f1af8929da
Client Type: Public (web app) - PKCE flow
Authorization URL: https://account.elihealth.myshopify.com/oauth/authorize
Token URL: https://account.elihealth.myshopify.com/oauth/token
Callback URL: https://app.eli.health/shopify/callback
⚠️ NOTE: No client secret for PKCE (public client for mobile apps)
Usage:
- Client ID: Used by mobile app to initiate OAuth flow
- No secret needed: PKCE uses code_verifier/code_challenge instead
Storage:
- Credentials documented in private file (contact Chip for access)
- Backend environment variables to be added (see "What's Next" below)
3. Storefront API Access Token (Not Yet Created)
Status: ⏸️ Optional - can be added later if needed
Usage: Public product browsing, checkout (if needed beyond Admin API)
Part 5: Testing Strategy
Testing Accounts
You need test Shopify customer accounts to test OAuth flow. Two options:
Option A: Create Test Customers in Your Store (Recommended)
- Go to Shopify Admin → Customers
- Click "Add customer"
- Fill in details:
- Email:
test-dev@eli.health(or your email) - First name: Test
- Last name: User Dev
- Password: Set a password
- Email:
- Click "Save"
- Repeat for each environment if needed:
test-dev@eli.healthtest-staging@eli.healthtest-prod@eli.health
Pros:
- ✅ Real customer accounts in your Shopify
- ✅ Can test full checkout flow
- ✅ Orders appear in your real order list (tagged as test)
Cons:
- ❌ Test orders appear in analytics (use
test_ordertag to filter)
Option B: Use Personal Shopify Accounts
- Create Shopify customer accounts using your personal email
- Use for testing OAuth and checkout
- Delete when done
Pros:
- ✅ Can test across multiple Shopify stores (if you have access)
Cons:
- ❌ Uses real email addresses
- ❌ Test orders mixed with personal orders (if you shop at your store)
Environment-Specific Testing
| Environment | What to Test | Test Account |
|---|---|---|
| Dev | OAuth flow, API integration, UI | test-dev@eli.health |
| Staging | Full checkout, order sync, webhooks | test-staging@eli.health |
| Production | Smoke test only, monitor real users | Real user accounts |
Part 6: Verification Checklist
✅ Completed
Admin API
- ✅ Admin API access token created
- ✅ Token has scopes:
read_products,read_customers,read_orders,read_inventory - ✅ Credentials documented (available from Chip or Eli dev team)
OAuth Configuration
- ✅ Headless storefront created: "Eli Health Mobile"
- ✅ Customer Account API configured
- ✅ Client ID generated:
2d989895-5913-4700-b2be-48f1af8929da - ✅ No client secret (PKCE public client - correct for mobile)
- ✅ Callback URL configured:
https://app.eli.health/shopify/callback - ✅ Backend controller created:
shopify-callback.controller.ts - ✅ AASA file updated with
/shopify/callbackpath
Backend Deep Link Handler
- ✅ Controller created:
eli-backend-api/src/modules/deep-links/shopify-callback.controller.ts - ✅ Registered in
app.module.ts - ✅ Route:
GET /shopify/callback - ✅ Handles OAuth redirect from Shopify
- ✅ Passes code to app via
eli://shopify/callback?code=...
⏭️ Next Steps (Not Yet Started)
Backend Deployment
- Deploy backend with new shopify-callback controller
- Test endpoint:
https://app.eli.health/shopify/callback?code=test
Backend Environment Variables
- Add Shopify credentials to backend
.envfiles - Test Admin API connection
Test Accounts
- Create test customer account in Shopify
- Document test credentials
Mobile App Implementation
- Implement OAuth PKCE flow
- Handle
eli://shopify/callbackdeep link - Exchange authorization code for access token
- Store tokens securely
Part 7: Configure Backend Environment Variables
Add these to your backend .env files (or Google Secret Manager for prod):
# Shopify Configuration
SHOPIFY_STORE_DOMAIN=elihealth.myshopify.com

# Admin API (for backend operations)
SHOPIFY_ADMIN_ACCESS_TOKEN=shpat_xxxxxxxxxxxxxxxxxxxxx

# OAuth 2.0 Customer Account API
SHOPIFY_OAUTH_CLIENT_ID=shp_xxxxxxxx-xxxx-xxxx-xxxx-xxxxxxxxxxxx
SHOPIFY_OAUTH_CLIENT_SECRET=shpss_xxxxxxxxxxxxxxxxxxxxxxxxxxxxxxxx

# Storefront API (optional)
SHOPIFY_STOREFRONT_ACCESS_TOKEN=[if created]
For each environment:
- Dev backend (local): Create
.env.developmentwith these values - Staging backend: Add to staging environment config
- Production backend: Use Google Secret Manager (existing pattern)
Part 8: Mobile App Configuration
The mobile app needs the Client ID and Store Domain. Two approaches:
Option A: Hardcode in Mobile App (Simpler)
Add to .env-cmdrc.js:
module.exports = {
  dev: {
    // ... existing config
    REACT_APP_SHOPIFY_CLIENT_ID: 'shp_xxxxxxxx-xxxx-xxxx-xxxx-xxxxxxxxxxxx',
    REACT_APP_SHOPIFY_STORE_DOMAIN: 'elihealth.myshopify.com',
  },
  stg: {
    // ... existing config
    REACT_APP_SHOPIFY_CLIENT_ID: 'shp_xxxxxxxx-xxxx-xxxx-xxxx-xxxxxxxxxxxx',
    REACT_APP_SHOPIFY_STORE_DOMAIN: 'elihealth.myshopify.com',
  },
  prod: {
    // ... existing config
    REACT_APP_SHOPIFY_CLIENT_ID: 'shp_xxxxxxxx-xxxx-xxxx-xxxx-xxxxxxxxxxxx',
    REACT_APP_SHOPIFY_STORE_DOMAIN: 'elihealth.myshopify.com',
  },
};
Note: Client ID is public (not sensitive), so it's safe to include in mobile app.
Option B: Fetch from Backend (More Secure)
Mobile app calls GET /shopify/oauth/config to get Client ID and store domain from backend. This way credentials stay on server.
Part 9: iOS Configuration Updates
Add Shopify callback to iOS URL schemes:
Edit Info.plist
Location: /ios/Eli/Info.plist
Current URL schemes:
<key>CFBundleURLSchemes</key>
<array>
    <string>eli</string>
</array>
No changes needed! The existing eli:// scheme already handles eli://shopify/callback.
Shopify OAuth will redirect to: eli://shopify/callback?code=xxxxx&state=xxxxx
Your app's deep linking handler needs to recognize the /shopify/callback path.
Part 10: Testing OAuth Flow (Before Mobile Implementation)
Before implementing OAuth in the mobile app, test it manually to verify Shopify setup:
Browser Test (Quick Verification)
- Get your OAuth authorization URL:
https://elihealth.myshopify.com/account/authorize?
  client_id=YOUR_CLIENT_ID
  &scope=openid+email+customer-account-api:full
  &redirect_uri=eli://shopify/callback
  &state=random_state_string
  &response_type=code
-
Replace:
YOUR_CLIENT_IDwith your actual Client ID from Shopifyrandom_state_stringwith any random string (e.g.,test123)
-
Open URL in Safari on your iPhone (must have Eli app installed)
-
Log in with test customer account
-
Authorize the app
-
iOS should prompt: "Open in Eli?" → Tap Open
-
Your app should open with the OAuth callback
Note: Since eli:// is a custom scheme, you can't test in desktop browser. You must test on actual iOS device with Eli app installed.
Expected result:
- If setup correct: App opens via deep link with
eli://shopify/callback?code=...&state=... - If setup incorrect: iOS shows "Cannot Open Page" or Shopify shows error
Testing without implementing deep link handler: Since you haven't implemented the OAuth callback handler yet, the app might open but not do anything. That's OK! The goal is to verify:
- Shopify OAuth page loads
- You can log in with test account
- iOS prompts to open Eli app
- App opens (even if it doesn't handle the callback yet)
Common Errors
| Error | Cause | Fix |
|---|---|---|
| "Redirect URI mismatch" | Redirect URI not configured | Add exact URI to Shopify app config |
| "Invalid client" | Wrong Client ID | Double-check Client ID is correct |
| "Invalid scope" | Scope not granted | Enable Customer Account API scopes |
Part 11: Summary & Next Steps
✅ What You Now Have (COMPLETED)
- ✅ Custom App created: "Eli Health Mobile"
- ✅ Headless storefront created: "Eli Health Mobile"
- ✅ Admin API Token:
shpat_7dbc...5948with read-only scopes - ✅ OAuth Client ID:
2d989895-5913-4700-b2be-48f1af8929da - ✅ PKCE public client configured (no client secret needed)
- ✅ Callback URL:
https://app.eli.health/shopify/callback - ✅ Backend deep link handler:
shopify-callback.controller.ts - ✅ AASA file updated with
/shopify/callbackpath - ✅ Store domain:
elihealth.myshopify.com - ✅ Credentials documented (contact Chip or Eli dev team for access)
🚀 What's Next (YOUR IMMEDIATE TASKS)
1. Deploy Backend Changes ⚡ DO THIS FIRST
The backend controller is created but not yet deployed. Deploy to enable the OAuth callback:
cd eli-backend-api
npm run build
# Deploy to your environment
Test it works:
https://app.eli.health/shopify/callback?code=test123&state=abc
Should show fallback page with "Shopify Account Linking" heading.
2. Add Backend Environment Variables
Add to eli-backend-api/.env (or Google Secret Manager for prod):
# Shopify Configuration
SHOPIFY_STORE_DOMAIN=elihealth.myshopify.com

# Admin API (for backend queries)
SHOPIFY_ADMIN_ACCESS_TOKEN=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
SHOPIFY_API_KEY=2641be696c6c743a75a979445f1f2a1c
SHOPIFY_API_SECRET=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

# OAuth Customer Account API (for mobile customer auth)
SHOPIFY_OAUTH_CLIENT_ID=2d989895-5913-4700-b2be-48f1af8929da
SHOPIFY_OAUTH_CALLBACK_URL=https://app.eli.health/shopify/callback
SHOPIFY_OAUTH_AUTHORIZE_URL=https://account.elihealth.myshopify.com/oauth/authorize
SHOPIFY_OAUTH_TOKEN_URL=https://account.elihealth.myshopify.com/oauth/token
3. Create Test Customer Account in Shopify
- Go to Shopify Admin → Customers
- Click "Add customer"
- Fill in:
- Email:
test-shopify@eli.health - First name: Test
- Last name: Shopify
- Password: Create a password
- Email:
- Click "Save"
- Test login at:
https://account.elihealth.myshopify.com
4. Implement Mobile App OAuth Flow (Phase 2)
This is the main implementation work. You'll need to:
-
Install dependencies:
npm install react-native-inappbrowser-reborn
# For PKCE: generate code_verifier and code_challenge -
Create Shopify OAuth service (
services/shopify-oauth.ts):- Generate PKCE code_verifier and code_challenge
- Build authorization URL
- Open in-app browser
- Handle callback via deep link
- Exchange code for access token
-
Update deep link handler (
UniversalLinkHandler.tsx):- Add route for
/shopify/callback - Extract
codeandstateparameters - Verify state (CSRF protection)
- Call backend to exchange code for token
- Add route for
-
Create Shopify API service:
- Store access token securely (encrypted AsyncStorage)
- Call Shopify Customer Account API
- Link Shopify customer ID with Eli user ID
-
Add UI screen:
- "Connect Shopify Account" button
- OAuth flow progress indicators
- Success/error handling
See: /home/chipdev/eli.health/eli-docs/docs/implementation-plans/shopify-integration.md for detailed mobile implementation plan.
Troubleshooting
Issue: "Redirect URI mismatch"
Cause: The redirect URI in the OAuth request doesn't match what's configured in Shopify.
Solution:
- Check Shopify app configuration: Settings → Apps → Eli Health Mobile App → Configuration → Customer Account API → Redirect URIs
- Verify exact match (including
http/https, trailing slash, path) - Remember: iOS uses
eli://shopify/callback, Android useshttps://...
Issue: "Invalid client"
Cause: Client ID is incorrect or app not installed.
Solution:
- Go to Shopify Admin → Apps → Eli Health Mobile
- Verify app is installed (should show "Installed" status)
- Double-check Client ID matches
Issue: iOS doesn't prompt to open app
Cause: Custom URL scheme not registered or app not installed.
Solution:
- Verify app is installed on device
- Check Info.plist has
eliURL scheme registered - Try uninstalling and reinstalling app
- Test with simple URL:
eli://testin Safari to verify scheme works
Issue: OAuth works in dev but not prod
Cause: Different redirect URI or environment mismatch.
Solution:
- Verify correct redirect URI used for prod build
- Check prod backend uses correct Client ID/Secret
- Verify prod domain universal links configured
Part 12: Local Testing with Ngrok
For local development and testing, you need HTTPS because Shopify requires secure callback URLs. Using http://localhost won't work. Here's how to set up local testing with ngrok.
Why Ngrok?
Problem: Shopify requires HTTPS callback URLs, but your local backend runs on http://localhost:7429
Solution: Ngrok creates a secure HTTPS tunnel to your local backend
Alternatives considered:
- ❌
http://localhost:7429- Shopify rejects HTTP URLs - ❌
localtest.mewith mkcert - Requires SSL certificate setup and mobile device certificate trust - ✅ Ngrok - Instant HTTPS, no certificate management needed
Setup Instructions
1. Install Ngrok
Ngrok is likely already installed. Check with:
which ngrok
ngrok version
If not installed:
# On Ubuntu/Debian
curl -s https://ngrok-agent.s3.amazonaws.com/ngrok.asc | sudo tee /etc/apt/trusted.gpg.d/ngrok.asc >/dev/null
echo "deb https://ngrok-agent.s3.amazonaws.com buster main" | sudo tee /etc/apt/sources.list.d/ngrok.list
sudo apt update
sudo apt install ngrok

# On macOS
brew install ngrok
2. Get Ngrok Auth Token
- Go to: https://dashboard.ngrok.com/get-started/your-authtoken
- Sign up or log in (free account works)
- Copy your authtoken
3. Configure Ngrok
ngrok config add-authtoken YOUR_AUTH_TOKEN_HERE
This saves your token to ~/.config/ngrok/ngrok.yml
4. Start Ngrok Tunnel
With your backend running on port 7429:
ngrok http 7429
You'll see output like:
Session Status                online
Account                       Your Name (Plan: Free)
Version                       3.x.x
Region                        United States (us)
Latency                       -
Web Interface                 http://127.0.0.1:4040
Forwarding                    https://3ceb60d5132b.ngrok-free.app -> http://localhost:7429

Connections                   ttl     opn     rt1     rt5     p50     p90
                              0       0       0.00    0.00    0.00    0.00
Copy the HTTPS URL: https://3ceb60d5132b.ngrok-free.app
Note: This URL changes every time you restart ngrok (unless you pay for a static domain)
5. Update Application Configuration
Backend .env file:
# Update callback URL to use ngrok
SHOPIFY_OAUTH_CALLBACK_URL=https://3ceb60d5132b.ngrok-free.app/shopify/callback
Mobile app shopify-oauth.ts:
const SHOPIFY_CALLBACK_URL = 'https://3ceb60d5132b.ngrok-free.app/shopify/callback';
Mobile app .env.local:
REACT_APP_API_ENDPOINT=https://3ceb60d5132b.ngrok-free.app
6. Add Ngrok URL to Shopify
- Go to Shopify Admin: https://admin.shopify.com/store/elihealth
- Navigate to: Sales channels → Headless
- Find: "Eli Health Mobile" storefront
- Click: "Manage" on Customer Account API
- Add callback URL:
https://3ceb60d5132b.ngrok-free.app/shopify/callback - Keep existing production URL:
https://app.eli.health/shopify/callback - Save changes
You can have multiple callback URLs, so you don't need to remove the production one.
Testing the Flow
- Start backend locally:
docker compose --profile backend up - Start ngrok:
ngrok http 7429(in separate terminal) - Note ngrok URL and update config files
- Add ngrok URL to Shopify callback URLs
- Start mobile app in local/dev mode
- Test OAuth flow:
- Open Settings → Shopify Store → Connect Shopify Account
- Login with Shopify customer account
- Authorize the app
- Should redirect back to app
Ngrok Web Interface
Ngrok provides a web interface at http://localhost:4040 where you can:
- See all HTTP requests/responses
- Inspect OAuth callback requests
- Debug authentication flow
- Replay requests
Very useful for debugging!
Tips
Keep ngrok running: Don't close the ngrok terminal - if you do, the URL stops working
URL changes: Free ngrok URLs change on restart. Update config files each time you restart ngrok.
Static URLs: Ngrok paid plans offer static domains like eli-backend.ngrok.app that don't change
Multiple tunnels: You can run multiple ngrok tunnels if you need to expose multiple local services
Cleanup After Testing
When you're done with local testing:
- Stop ngrok: Press
Ctrl+Cin the ngrok terminal - Revert config changes:
- Backend
.env: Change callback URL back to production - Mobile app: Revert to production API endpoint
- Backend
- Optional: Remove ngrok callback URL from Shopify (or leave it for next time)
Common Issues
Issue: "ERR_NGROK_107: Authentication failed"
Solution: Your authtoken is invalid or expired
- Go to https://dashboard.ngrok.com/get-started/your-authtoken
- Get a fresh token
- Run:
ngrok config add-authtoken YOUR_NEW_TOKEN
Issue: Ngrok URL changes and breaks the flow
Solution:
- Get the new ngrok URL from terminal output
- Update all config files with the new URL
- Update Shopify callback URL
Issue: "This site can't be reached"
Solution:
- Make sure ngrok is running
- Make sure backend is running on port 7429
- Check ngrok is tunneling to the correct port
Troubleshooting
Issue: "Invalid code" error during token exchange
Symptom: Mobile app successfully authenticates with Shopify but fails with "Invalid code" error when exchanging the authorization code for an access token.
Root Cause: OAuth authorization codes are single-use only. The in-app browser was caching the callback URL with an already-used authorization code, causing the same code to be reused on subsequent connection attempts.
Solution: Enable ephemeral web sessions in the in-app browser to ensure fresh PKCE parameters and authorization codes on each attempt.
// In shopify-oauth.ts
const result = await InAppBrowser.openAuth(authUrl, SHOPIFY_CALLBACK_URL, {
  ephemeralWebSession: true, // IMPORTANT: Use ephemeral session to ensure fresh OAuth flow each time
  showTitle: false,
  enableUrlBarHiding: true,
  enableDefaultShare: false,
});
Issue: SSL certificate errors when accessing OAuth endpoints
Symptom: Mobile app shows "This connection is not private" SSL certificate error when trying to authenticate.
Root Cause: Incorrect OAuth endpoint URLs. The custom vanity domain must use the correct path format.
Solution: Verify you're using the correct domain and path:
- ✅ Correct:
https://account.eli.health/authentication/oauth/authorize - ❌ Wrong:
https://account.elihealth.myshopify.com/oauth/authorize - ❌ Wrong:
https://account.eli.health/oauth/authorize(missing/authentication) - ❌ Wrong:
https://elihealth.myshopify.com/account/oauth/authorize
How to verify: Use Shopify's OpenID discovery endpoint:
curl https://elihealth.myshopify.com/.well-known/openid-configuration | jq -r '.authorization_endpoint, .token_endpoint'
Issue: Stuck at "signing you in" on Shopify page
Symptom: User authenticates successfully on Shopify but gets stuck on a loading screen.
Possible Causes:
- Incorrect OAuth token URL in backend environment variables
- Backend not properly configured to handle the callback
- Network connectivity issues between backend and Shopify
Solution:
- Verify backend environment variable
SHOPIFY_OAUTH_TOKEN_URLis set tohttps://account.eli.health/authentication/oauth/token - Check GCP Cloud Run logs for any errors during token exchange
- Ensure backend service account has proper permissions
Issue: Backend failing to exchange authorization code
Symptom: Backend returns 401 Unauthorized when calling Shopify token endpoint.
Root Cause: Missing or incorrect code_verifier in token exchange request. PKCE requires the mobile app's code_verifier to be sent to the backend for token exchange.
Solution: Ensure the mobile app sends the code_verifier along with the code and state to the backend's /shopify/oauth/exchange endpoint.
Issue: 401 "Invalid code" error when querying Customer Account GraphQL API
Symptom: Token exchange succeeds, but GraphQL queries return HTTP 401 with error message "Invalid code" or "invalid_token".
Root Cause: Missing Origin header or Origin not configured in Shopify JavaScript Origins list.
Solution:
-
Verify Backend Includes Origin Header: Check that your backend code includes the
Originheader in GraphQL requests:headers: {
'Authorization': `Bearer ${accessToken}`,
'Content-Type': 'application/json',
'Origin': 'https://account.eli.health', // REQUIRED!
} -
Add Origin to Shopify JavaScript Origins:
- Go to Shopify Admin → Sales Channels → Headless
- Find your storefront ("Eli Health Mobile")
- Click "Manage" on Customer Account API
- Scroll to "JavaScript Origins" section
- Add:
https://account.eli.health - Click "Save"
-
Verify the Origin Matches: The
Originheader in your code must EXACTLY match one of the origins configured in Shopify. Evenhttpvshttpsor a trailing slash will cause a mismatch.
Why this is required: Shopify's Customer Account API requires an Origin header for CORS security. Without this header, or if the origin isn't in the allowed list, Shopify rejects the request with a 401 error.
Reference: See "Step 5a: Configure JavaScript Origins" for detailed setup instructions.
References
- Shopify Customer Account API Documentation
- OAuth 2.0 with PKCE Specification
- Android App Links Documentation
- iOS Universal Links Documentation
Change Log
| Date | Author | Changes |
|---|---|---|
| 2025-11-12 | Samantha | Initial setup guide created |
| 2025-11-14 | Samantha | Added callback URL management screenshots and ngrok local testing guide |
| 2025-11-14 | Claude | Corrected OAuth URLs to use custom vanity domain account.eli.health/authentication/oauth/, added troubleshooting section with common issues and solutions |